App Design Roadmap: From Idea to a Development-Ready Result

A step by step guide on how to design your product from scratch.
Creating a product is a long and costly process. Hiring a team of developers for a large-scale project can cost tens of thousands of dollars per day. A correctly created design roadmap will answer crucial questions before starting the development and thus save a lot of time and money. When putting correctly, the questions, goals, formulated and tested hypotheses will help to achieve the desired results a lot quicker. A roadmap helps to build communication with your client and first users correctly, gives you everything necessary for a further growth, and, most importantly, the knowledge that the product is ready to meet the world.
Define the essentials
To transform your idea into a working product, you should have a clear understanding of the product goals and tasks, know which problems it will solve and to believe in its future success. The first stage is to make a list of hypotheses that you’ll need to test. Put simply, a hypothesis is something that we believe to be true based on limited evidence. To test a hypothesis during the first stage, try to talk to your potential clients to confirm (or debunk) your ideas, find out what your clients want, and make decisions based on the feedback. You can find more about conducting interviews in this article.
Find Your Target Audience
If you don’t think about a target audience at the start, the risk of creating a product for yourself only is very high. Who are these users who will benefit from your solution? Start identifying them by performing market segmentation. A client segment is a group of users who share the same problem. By taking a large client segment and starting narrowing it down you can identify a group with very distinct characteristics.
Remember that you don’t need to solve everyone’s problems — it’s better to concentrate on a smaller target audience. For example, if you offer transportation services, you don’t have to offer your service to all the people traveling around the globe but focus on couriers delivering documents in a big city during working hours.
To find your client, ask yourself the following questions:
Who needs your idea to be realized the most?
Why would people want your product to appear?
What is your target audience’s motivation to use your solution?
What are their additional motives?
Are there any other groups of people who have similar motivation?
You can describe the client segment using personas, fictional characters that you create based on your market research to represent different types of users who could use your service. This will help you to understand your users, their behavior and their requirements, which will help you find the right ideas and solutions. Any product can have more than one persona.
Make sure you have the following in the customer persona profile:
Information about education, lifestyle, hobbies, values, goals, requirements, restrictions, wishes, relationships and user behavior models, anything to understand his needs in the case of your business
Give a name to the persona
Attach a photo that represents the persona well

Create User Stories
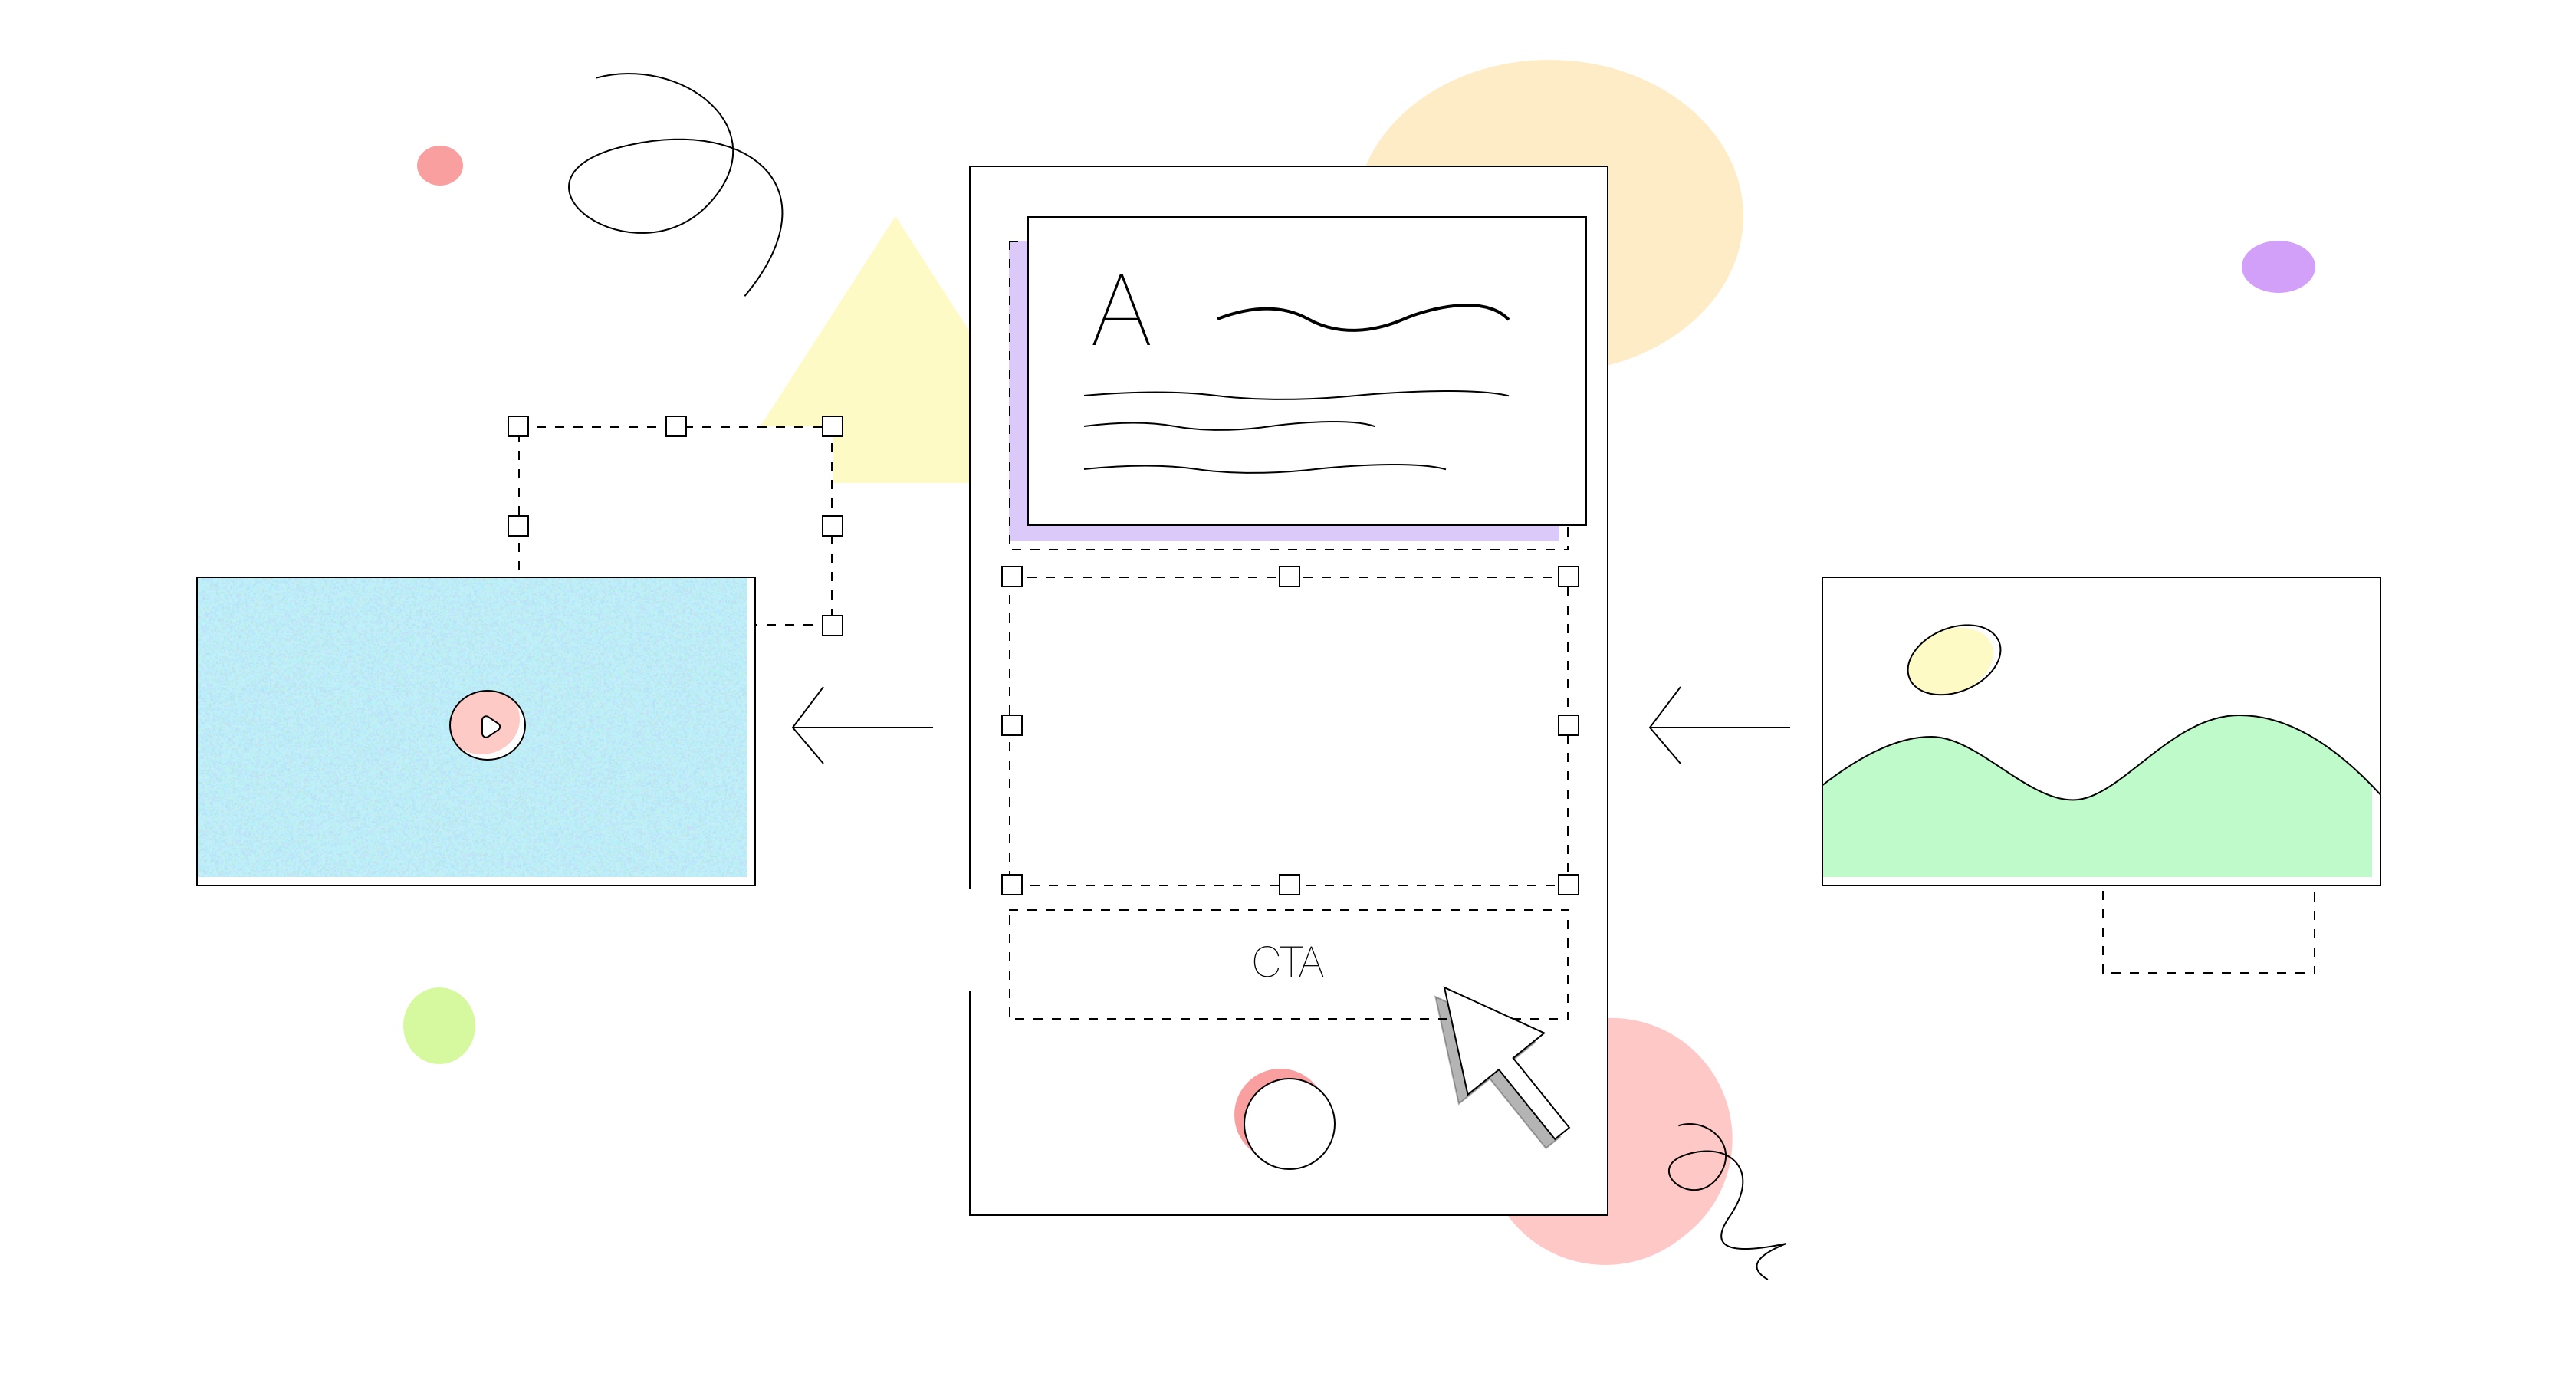
What is a user story? These stories show how people will use the product. The stories are concrete and abstract at the same time; they are thought-provoking and make you ask “what if?”, they always leave room for questions. Moreover, they set borders to your project without stopping development and innovations, and they are detailed enough for you to set tasks based on them.
A user story describes the user’s journey from the moment a problem appears to the moment when the user recommends a product to others. The picture above demonstrates a user’s action sequence: he encountered a problem → found the product (acquisition) → made a decision to use the product (activation) → solved the problem→ came back to the product (retention) → recommended the product to friends and family (referral).
A user story shows the user’s interaction with the product step by step: the optimal sequence from starting interacting with the UI to reaching his or her goal. Create a user story for each persona and map out how they would interact with the product. This stage will help the designer to come up with even more specific ideas.
Design information architecture (IA)
A mobile app’s navigation should be simple. Limit the number of menu options so that the user can stay focused on what’s important. Navigation should help users to find all the main features and content quickly. Use a simple drill-down structure and nest content into clear, easy to understand and well-defined categories. Map out the future app as a tree structure moving from top to bottom and describe the functionality of each screen. Then, connect the screen the way your users are likely to navigate them. Don’t worry too much about the number of taps or clicks: “3 clicks away” is an outdated strategy from the 90s. Instead, focus on your users and ensure that they always understand where they are and where to go next. If navigation is simple and easy to understand, the number of clicks doesn’t matter.

Create a Mood Board
The mood board was invented long before the digital age. These days it helps the team to work in sync, understand the look and feel long before the designer starts working, and reduces the number of disagreement and futile work during the design process. A mood board can consist of general references, of mood-creating images, or of specific UI examples that could be used for inspiration. Dedicate a part of the mood board to typography, a part to colors, a part to UI solutions and animation, and so on. Make sure that the team shares your view before you start working on the visual design, but remember that your job is not to adapt to someone else’s taste, but to offer a solution based on specific examples.

Wireframes
A wireframe is a technical document (just like most things mentioned above), so there’s no need to pay too much attention to its looks. First of all, it’s a scheme of the screen, its a plan made of lines, boxes, and labels. Don’t use too many colors at this stage — two are enough, and keep the focus on the functionality. Wireframes are similar to blueprints used by architects because they serve a similar purpose. Don’t confuse wireframes with quick sketches: while they are alike, the sketches can only be used during brainstorming and describing ideas, and as the basis for making wireframes.
Drawing a wireframe can take up as little as an hour but only after you’ve spent a certain amount of time planning and sketching. Keep working until your graphics designer or front-end developer can use your wireframe as guidelines.
Design Look and Feel
The good news is that we’ve finally reached the design stage. After all, UX isn’t something the users notice straight away — it’s the UI design that they’ll see and that will influence their perception of the app. Design makes your brand recognizable, adds personality to it, and ultimately creates a loyal audience.
Good design follows several main principles:
The interface should be easy to understand and should have no double meanings, so that the user doesn’t need to read any manuals to start using the app.
The interface should be familiar for a user. Use OS guidelines and common design principles to make the user feel at home. If you use your own design patterns, they should be repeated throughout the app so that the user could become familiar with the design quicker and understand immediately how it works.
The interface should provide feedback and a clear understanding of what’s going on. In terms of navigation, it lets the user know where the user is now, where the user can go next, and how to get back.
Design esthetics. Even though currently the trend is to focus on how the app works instead of how it looks, you shouldn’t disregard the visual component. The industry standards are very high, it means that users are more likely to use an app that looks great and has a modern design.After all, ultimately that affects the UX.

Prototype
You should start prototyping during the wireframing stage, build a low-fidelity prototype and start testing, but let’s talk about it just now, as it is time to share it with a wider community. The prototyping stage does the following:
Idea validation. Share the prototype with your potential users and check if they find your product easy to use. Gather their first feedback, pinpoint mistakes and fix them on the go. This will help you save time and money during development and create a product that offers a much better user experience than products that go from concept to development without passing through the initial feedback stage.
Presentation to the client or the investor. A prototype is a lot more understandable than all your talks about the product and design mockups. Because the user can click through the prototype and see it as a real app, it’ll be easier to share your ideas and be aligned with the client or the investor.
A visual guides for the developer. The prototype will help your developer see how the app should work, to measure everything, to see colors, and to download all necessary design elements.
It’s up to you which prototyping tool to use — you don’t even need to code to create a clickable prototype these days.

Hand-off
You could start working with the developers during the wireframing stage but let’s take it as the final stage. Make sure that developers don’t have to do any design work and can use your prototype as guidelines. Describe all visual components: measures, colors, fonts, UI elements, and their different states, screen interaction features. Icons and other graphical elements should be exported and ready for download in the correct format and resolution. Don’t overlook any details because the quality of the design you deliver affects the quality of the development and the product.
Conclusion
In most of the cases, the roadmapping process is pretty much the same, but, please, take it as a principle and modify it to match your specific needs. It’s not always wise to use the same scenario — everything depends on the situation and requirements. That’s why this article lists general recommendations and doesn’t offer any strict rules or specific tools. When you gain experience and understand the importance of each stage, you’ll be able to act accordingly to the circumstances and work with the maximum efficiency.
Igor is a user experience and interface designer with a passion for inclusive user-centered design and more than ten years of experience in digital design. He can apply his expertise and make the product stand out on the market or improve important numbers. Using a research approach, he partners with his clients to collect data to create evidence-based, proven solutions that support the outcomes they seek.
Follow author on Dribbble